Design Multigenerational Layouts for Family Harmony
Quick Take
- Establish distinct privacy and shared zones to ensure each family member feels comfortable and included.
- Incorporate circulation, storage solutions, and soundproofing from the initial planning phase.
- Integrate accessible features and adaptable spaces to accommodate changing family requirements over time.
- Consult local regulations and professionals for installations involving kitchens or independent entrances.
Pros and Cons
Pros
- Lowers overall housing expenses through shared ownership of a single property.
- Maintains close proximity for mutual support, caregiving, and daily companionship.
- Offers versatile areas suitable for overnight guests, rental income, or dedicated home offices.
- Enhances property resale potential when executed with high-quality materials and thoughtful design.
Cons
- Requires additional plumbing, electrical upgrades, and enhanced soundproofing measures.
- May encounter restrictions from zoning laws or permitting processes, particularly for secondary kitchens.
- Accelerates usage on communal infrastructure such as heating, ventilation, air conditioning systems, and water heaters.
- Potential for conflicts over personal space if pathways through private areas cannot be avoided.
Step-by-Step: Plan the Layout
Tools and Materials
- Measuring tape for accurate dimensions.
- Graph paper or digital design software for sketching layouts.
- Level and stud finder to assess existing structures before modifications.
- Electrical tester to verify safety during wiring checks.
- Personal protective equipment including gloves, safety goggles, and a dust mask.
Time and Difficulty
Initial planning requires several days of assessment and sketching. Actual construction varies from moderate effort for minor adjustments to complex projects involving structural, plumbing, or electrical changes.
1. Map Family Needs
Compile a detailed list of household members and their specific privacy requirements. For instance, working adults often prefer a compact kitchenette paired with an en-suite bathroom for self-sufficiency. Children require proximity to caregivers while maintaining dedicated sleeping quarters. Older adults gain the most from ground-level accommodations featuring wider doorways and minimal steps.
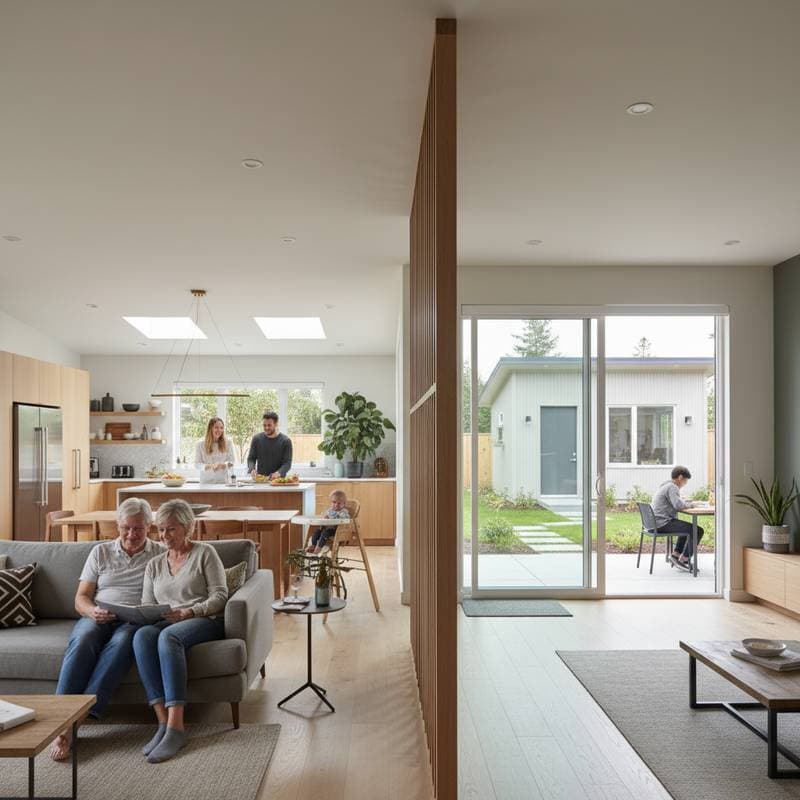
2. Define Shared and Private Zones
Identify communal areas for meal preparation, eating, laundry, and social gatherings. Next, outline individual suites complete with private entrances or dedicated hallways to foster independence. Ensure at least one central living space promotes family interaction without intrusion.
3. Plan Circulation Paths
Design routes that prevent unnecessary passage through sleeping or personal areas. Provide each suite with a straightforward path to primary hallways or outdoor access points. Opt for pocket doors or sliding partitions to maximize space efficiency and ease of movement.
4. Address Sound and Smell
Incorporate extra insulation within walls and ceilings separating suites to dampen noise transmission. Install solid-core doors equipped with sweeps to block sound leakage. Equip bathrooms and kitchens with exhaust fans to effectively manage odors and maintain air quality.
5. Add Accessibility Early
Anticipate mobility challenges by including universal design elements from the outset, regardless of current needs. Specify doorways measuring at least 36 inches wide to accommodate wheelchairs. Select zero-threshold showers for seamless entry and lever-style handles over traditional knobs for simpler operation. Such provisions benefit all residents by promoting ease and safety.
6. Check Codes and Permits
Verify compliance with local building codes prior to installing full kitchens, laundry facilities, or additional entrances. Certain jurisdictions classify a second kitchen as an independent dwelling unit, necessitating an accessory dwelling unit permit and professional review. Submit architectural drawings for approval well in advance of any construction activity.
7. Test Layout Virtually or With Tape
Apply painter's tape to floors to outline proposed walls, doorways, and pathways. Simulate daily routines by walking through the marked spaces to evaluate usability. Refine any cramped areas or undesirable visual overlaps before committing to permanent changes.
8. Build or Convert Safely
Disconnect electricity and water supplies before commencing demolition work. Reinforce load-bearing walls using temporary supports to prevent structural compromise. Engage licensed specialists for all plumbing, electrical, and framing tasks to guarantee adherence to safety standards.
9. Inspect and Seal
Following initial installations, verify alignment of electrical outlets, ventilation ducts, and drainage lines against the approved plans. Apply sealants around penetrations for pipes and wires to enhance fire resistance. Fit weatherstripping to doors dividing zones for improved energy efficiency and noise reduction.
10. Clean Up and Dispose
Separate recyclable materials such as drywall scraps, wood lumber, and metal fixtures. Transport non-recyclable items like old insulation or paint residues to designated hazardous waste facilities in accordance with local guidelines.
DIY vs Pro
Safe for DIY
- Conducting measurements and developing preliminary layout sketches.
- Applying paint, installing flooring, and adding trim details.
- Mounting shelves or fixtures on existing electrical circuits.
- Erecting non-load-bearing interior framing if familiar with basic construction techniques.
Hire a Pro When
- Relocating or installing new plumbing, gas lines, or electrical conduits.
- Altering load-bearing walls or structural elements.
- Creating additional exterior doors or windows.
- Developing a complete accessory dwelling unit or standalone suite.
What the Pro Does Differently
Licensed contractors handle permit applications, schedule required inspections, and confirm adequate fire barriers between living units. They engineer mechanical systems to ensure balanced ventilation and capacity distribution. Professionals also arrange comprehensive insurance to cover the expanded living arrangements.
Alternatives
Option A: Internal Suite Conversion
Repurpose an existing basement, attic, or side wing into a self-contained suite featuring a private bathroom and kitchenette. This approach suits families seeking closeness without complete isolation. Consider potential drawbacks such as reduced natural illumination or lower ceiling heights in converted spaces.
Option B: Attached ADU
Construct an extension linked by a common wall or covered walkway to the main residence. Ideal for relatives desiring autonomy, such as live-in aides or independent adults. Balance the advantages of greater privacy against elevated expenses and regulatory hurdles.
Option C: Detached ADU
Erect a compact standalone structure in the rear yard equipped with full utility hookups. Perfect for elderly parents or grown children pursuing maximum independence. Account for zoning permissions and the need for independent utility metering.
Checklist: Your Multigenerational Layout Plan
- Define occupancy assignments and shared resource allocations.
- Verify zoning allowances for secondary living units or additional kitchens.
- Design accessible pathways and entry points throughout.
- Isolate plumbing, electrical, and heating systems by zone.
- Implement soundproofing measures between rest areas.
- Provision communal storage and interaction spaces.
- Select robust, low-maintenance surface materials.
- Establish routines for yearly safety evaluations and upkeep.
Condition Check
Signs It Works
Family members access common areas without traversing private bedrooms. Noise levels remain contained within individual suites. Overnight visitors integrate smoothly with little interference to routines.
Signs It Fails
Congestion occurs around bathrooms or laundry facilities. Cooking smells permeate multiple zones. Residents lack designated quiet areas for work or relaxation.
Address these issues by reconfiguring pathways or installing dividing screens to restore balance.
Budget Check
Upfront Cost
Allocate primary funds toward framing, plumbing installations, and heating, ventilation, air conditioning upgrades. Include a 10 to 15 percent buffer for unforeseen code compliance adjustments or permitting fees.
Lifespan
Durable materials and modern systems endure for decades when maintained properly.
Maintenance
Reserve funds yearly for tasks like filter replacements, grout resealing, and refreshing communal surfaces.
Resale Effect
Thoughtfully planned multigenerational features attract buyers seeking adaptable homes, accelerating sales. Conversely, haphazard modifications may detract from market value if they appear uncoordinated.
Pro Tips for Success
-
Plan Plumbing in One Stack
Align kitchens and bathrooms along a single vertical line to minimize piping expenses and streamline exhaust systems. -
Use Shared Laundry Smartly
Position the laundry room adjacent to communal areas, ensuring unobstructed access from all suites. -
Add Natural Light
Incorporate transom windows or skylights to illuminate enclosed suites without compromising privacy. -
Think Sound Early
Place an acoustic underlayment beneath flooring to significantly reduce impact noise across levels. -
Label Circuits and Valves
Clearly mark electrical panels and shutoff valves for each suite to facilitate quick responses during emergencies. -
Keep Neutral Decor
Choose subdued palettes and uncomplicated textures to suit diverse preferences and appeal to prospective purchasers. -
Plan for Future Conversion
Route wiring and pipes flexibly so private areas can transition into income-generating rentals or professional workspaces.
Making It Happen
A multigenerational home thrives through deliberate planning that honors both autonomy and unity. Begin with modest updates, such as reconfiguring a single suite or modernizing a communal kitchen. Test every route to anticipate how family dynamics will unfold in daily life.
As needs shift, so too can the space. The true measure of success lies in fostering an environment of mutual respect, ease, and enduring family bonds.


