The Retrofit Strategy That Renders Homes Flood-Resistant
Quick Overview
- Prioritize elevation, sealing, and water redirection to exclude moisture from the interior.
- Integrate structural modifications with efficient drainage solutions and resilient surface treatments.
- Anticipate expenses from moderate levels for basic enhancements to substantial investments for comprehensive elevations and premium materials.
- Engage professionals for intricate tasks such as structural lifting, utility relocations, or adherence to building codes.
Advantages and Disadvantages
Advantages
- Diminishes flood restoration expenses by thousands of dollars annually.
- Lowers insurance rates in numerous flood-vulnerable areas through certified compliance.
- Safeguards electrical systems, heating, ventilation, air conditioning units, and foundational elements from water intrusion.
- Enhances property market value, particularly in regions prone to inundation.
Disadvantages
- Involves significant initial outlay for elevation projects or foundational alterations.
- Necessitates obtaining permits and undergoing rigorous inspections.
- Causes temporary disruption to daily routines during the construction phase.
- Compatibility varies; not every architectural style or soil composition supports identical approaches.
Step-by-Step Guide: Implementing Flood Protection Retrofits
Essential Tools and Materials
- High-quality concrete sealant for durable crack filling.
- Heavy-duty vapor barrier plastic sheeting for interior moisture control.
- Reliable submersible sump pump equipped with battery backup.
- Coarse gravel, fine sand, and perforated drainpipe for perimeter drainage.
- Quick-setting hydraulic cement for immediate repairs.
- Ground fault circuit interrupter outlets and elevated junction boxes for electrical safety.
- Personal protective equipment, including gloves, respiratory masks, and safety goggles.
Estimated Time and Complexity
- Partial sealing and drainage improvements require 3 to 10 days.
- Complete elevation or foundational retrofits demand 2 to 4 weeks.
- Overall difficulty ranges from moderate for surface-level tasks to high for structural interventions.
1. Conduct Inspection and Measurements
Begin with a certified flood risk evaluation from a local authority or utilize government-provided flood zone maps available online. Compare the elevation of your lowest occupied floor against the anticipated flood depth, typically determined by the 100-year floodplain standard. Identify and document all potential water ingress points, such as foundation vents, hairline cracks, door sills, and utility penetrations.
2. Seal the Foundation Thoroughly
Prepare surfaces by scrubbing cracks clean with a stiff wire brush to remove debris and loose particles. Inject hydraulic cement into fissures to create a watertight bond that expands slightly upon curing. Coat exterior foundation walls with a specialized waterproof masonry sealant, applying two layers for optimal penetration. On interior surfaces, install vapor barrier sheeting or apply penetrating concrete sealants to prevent capillary action from drawing moisture upward.
3. Elevate Vital Systems Above Flood Levels
Relocate electrical outlets, heating, ventilation, and air conditioning components, as well as water heaters, to a minimum height of one foot beyond the projected flood elevation. Secure these units on reinforced concrete pedestals or sturdy wall-mounted brackets designed for flood resistance. Upgrade all susceptible outlets to ground fault circuit interrupter models, which automatically interrupt power during water exposure to mitigate electrocution risks.
4. Enhance Site Drainage Efficiency
Position a submersible sump pump in the lowest interior point, ensuring it includes a battery backup for power outage scenarios. Route discharge pipes at least 10 feet from the foundation, directing water to a storm drain or swale to avoid recirculation. Regrade surrounding soil to achieve a minimum slope of one inch per linear foot away from the structure for the initial six feet, preventing surface pooling during heavy precipitation.
5. Incorporate Flood Vents or Temporary Barriers
In structures featuring crawl spaces or basements, fit engineered flood vents compliant with federal standards; these allow hydrostatic pressure equalization by permitting controlled water flow without structural compromise. For ground-level entrances, deploy removable flood barriers such as accordion-style panels or custom-fitted watertight doors that seal against sills and frames during alerts.
6. Perform Structural Elevation (Advanced Procedure)
Contract licensed structural engineers and contractors to hydraulically raise the entire building frame, then construct an elevated foundation using pilings or breakaway walls. This method provides the highest degree of long-term resilience in severe flood zones. Obtain preliminary designs, secure necessary permits from municipal planning offices, and schedule phased inspections to validate engineering integrity.
7. Verify Installation Through Testing
Upon completion, simulate flood conditions by directing a garden hose along the building perimeter for 30 minutes to detect any seepage. Activate sump pumps manually to ensure proper cycling and backup functionality. Test ground fault circuit interrupter outlets by pressing the reset button and confirming trip response to moisture simulation.
8. Finalize Cleanup and Storage
Remove and dispose of spent sealants, construction debris, and packaging materials in accordance with local regulations for hazardous waste handling. Organize surplus tools and materials in a secure, elevated storage area to facilitate periodic maintenance and prevent degradation from environmental exposure.
DIY Approaches Versus Professional Services
Suitable for Do-It-Yourself Efforts
- Applying sealants to visible cracks and exterior coatings on accessible walls.
- Mounting sump pumps with integrated check valves to prevent backflow.
- Modifying site grading using shovels, rakes, and basic landscaping tools.
Circumstances Requiring Professional Expertise
- Any structural lifting or new concrete pouring that affects load-bearing elements.
- Relocation of electrical wiring, plumbing, or gas lines to elevated positions.
- Installation of flood vents or barriers needing certification for code compliance.
- Evaluation of unstable soil or intricate subsurface drainage networks.
Distinct Value Provided by Professionals
Engineers develop customized reinforcement plans that align with local elevation requirements and venting protocols. They ensure eligibility for insurance incentives or federal grant programs, such as those from the Federal Emergency Management Agency. Coordination of multi-agency inspections guarantees full regulatory adherence and documentation for future claims.
Ongoing Maintenance and Preventive Measures
Recommended Schedule
Perform comprehensive checks biannually or immediately prior to peak rainfall periods in your region.
Key Maintenance Activities
- Operate sump pumps and backup systems through full test cycles to confirm operational readiness.
- Examine all sealants and coatings for emerging cracks, erosion, or peeling, then reapply as needed.
- Remove accumulated leaves, sediment, and blockages from downspouts, gutters, and perimeter drains.
- Reassess soil grading to verify consistent outward slope, adjusting for erosion or settling.
Expected Results
These routines maintain a moisture-free foundation, intact structural walls, and reliable drainage pathways, ensuring water remains exterior to the living spaces.
Alternative Flood Mitigation Techniques
Dry Floodproofing Methods
Ideal for homes with solid masonry or concrete perimeter walls. This approach employs impermeable coatings, sealed barriers, and reinforced entry doors to repel water entirely. It proves effective for floods lasting under 24 hours but demands flawless sealing to avoid pressure buildup.
Wet Floodproofing Strategies
Suited to non-living areas like garages, basements, or crawl spaces. Design allows controlled water entry while incorporating flood-resistant materials such as sealed concrete floors and elevated storage. This option simplifies post-flood cleanup and incurs lower costs compared to full elevation.
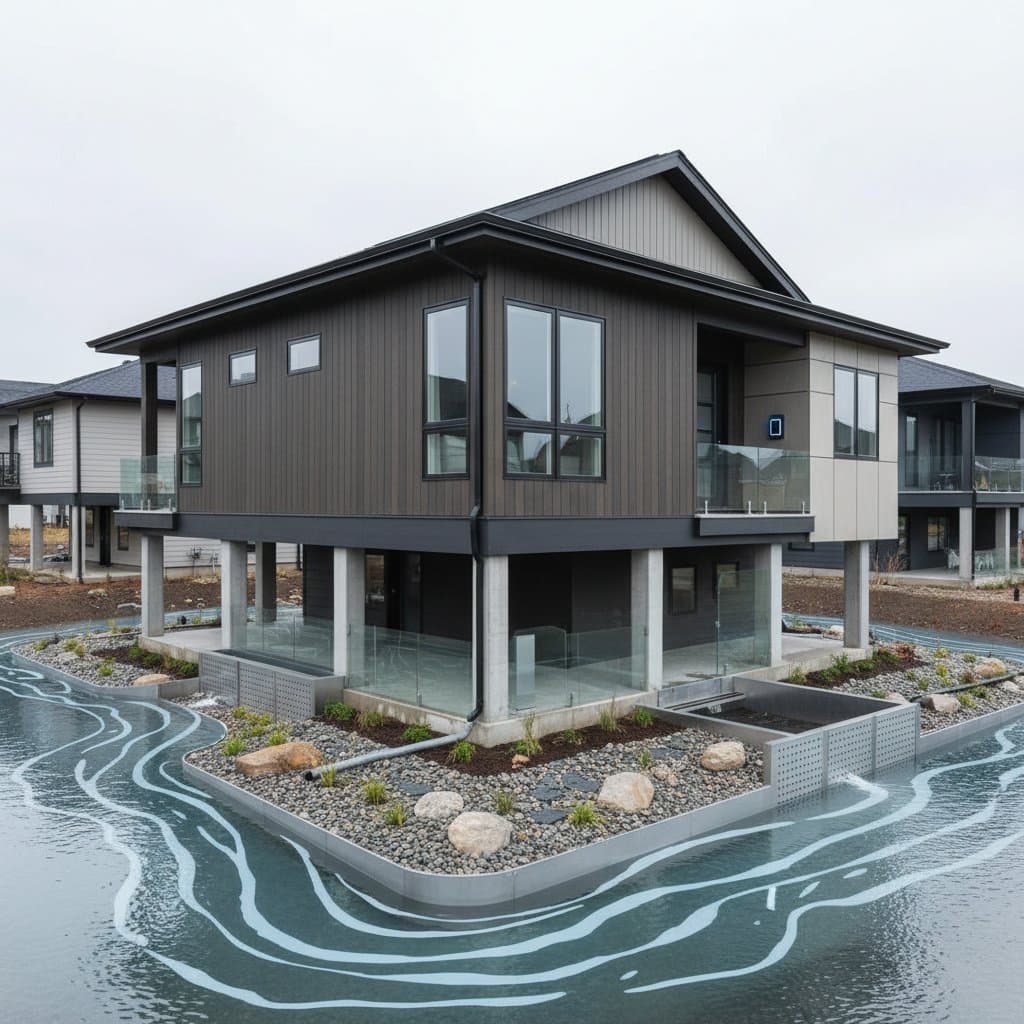
Comprehensive Structural Elevation
Recommended for properties in extreme risk categories. The building elevates entirely above the base flood level, often on piers or columns. Although the priciest upfront, it delivers enduring protection against repeated inundations.
Frequently Asked Questions
How Can One Determine Eligibility for Structural Elevation?
Consult a structural engineer or contact the local building department to assess soil bearing capacity, existing foundation configuration, and applicable permit criteria based on site-specific data.
Do Flood Vents Contribute to Insurance Savings?
Affirmative; vents certified under standards like those from the International Code Council can qualify for premium reductions when properly installed and documented.
What Maintenance Do Flood Barriers Require?
Regular attention is essential; inspect gaskets, seals, and panels annually or following any water event to replace degraded components and preserve integrity.
Advancing Your Flood Resilience Plan
Initiate with foundational actions like crack sealing, pump installations, and grading adjustments to yield quick gains. Progress to intermediate enhancements such as vent fittings or barrier deployments, culminating in elevation if risk assessments warrant it. Each incremental step fortifies defenses, transforming potential disaster into manageable inconvenience. This strategic retrofit not only averts immediate threats but accelerates recovery, preserving your home's value amid uncertain weather patterns.


